Activity 2 - CSS
Style it with CSS
Tags tell the browser what website elements to use. But we also need to tell it how to display the elements, and where to place them. We may want the title on the center or on the right side. We may want a picture on the right and a paragraph on the left. There are two ways we can do this: through HTML attributes or Cascading Style Sheets.
Cascading Style Sheets (CSS)
HTML attributes are straight-forward but they can become messy quickly. If we wish to do a lot of styling, each HTML element can become long and hard to read. Furthermore, what if we want to style many elements the same way? We would have to copy all the attributes for each element, which is not efficient and prone to mistakes. For most styling, it’s better to use CSS.
CSS files work closely with HTML tags. Each HTML tag can have a class attribute and/or an id attribute that helps to identify each element. Many elements can have the same class, and an element can have multiple classes. However, an element can only have one single id, and the id cannot be shared among elements. The CSS file uses these attributes to display styling specific to each class or id.
See this example below:
See the Pen Styling it up by Deliana Escobari (@Sunny-Dee) on CodePen.
Click the "HTML" tab on the top left corner to see the HTML code, and the "CSS" tab to see the CSS code.Let’s take a look at the HTML code. Try to find a <div> tag with the attribute “info”. It looks like <div id=“info”>. By giving this div an id, we can then use CSS to specify styling for this specific element.
Switch over to the CSS file. We can also give styling to all elements of a specific type - for example, we could use CSS give all <p> elements the same style. In the header block, we tell the browser to color all the headers #0097A7 (which is the teal color).
Let’s talk about the syntax (or the way of writing) for CSS. First, you start with what element you want to style. If you want to style all elements with the same tag (such as <header>), simply write the name. If you want to style an element with a class or id, put a . or a # in front of the class or id name respectively. Then, for each property you wish to change, use the format attribute-name: value;. Don’t forget to end each line with a ;. All these styles should be surrounded by the curly braces { and }.
There are way too many style elements to cover them all in this tutorial. If, in the sketch you made earlier, you aren’t sure how to use CSS to accomplish the desired styling, try searching online.

While CSS understands 140 color names such as “green”, “red”, and “blue”, this can still be limiting. What about if we want a dark green, or a slightly lighter green? To achieve this, we can also refer to colors in hexadecimal or RGB form. Check this link to see the colors and their corresponding hexadecimal form.
Adding a new font
As you might know, there are multiple fonts that you can use. This part will show you how to import different fonts to your site.
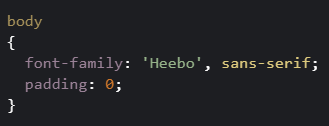
- Let’s import the Heebo font from the internet. First we import the font at the top of the CSS file with this statement:
@import url('https://fonts.googleapis.com/css?family=Heebo|Open+Sans'); - Then we assigned it to the body tag. Since this tag will contain all the other HTML elements, our choice of font will be used for all elements.
- Notice that the format inside the curly braces is:
name: value;@import url('https://fonts.googleapis.com/css?family=Roboto+Mono');font-family: 'Roboto Mono', monospace;@import url('https://fonts.googleapis.com/css?family=Indie+Flower');font-family: 'Indie Flower', cursive;@import url('https://fonts.googleapis.com/css?family=Pacifico');font-family: 'Pacifico', cursive;@import url('https://fonts.googleapis.com/css?family=Permanent+Marker');font-family: 'Permanent Marker', cursive;
Activity 2 - Adding attributes and style
It’s now time to make our website pretty! To complete this activity, you will need to complete the following steps:
Open the web editor (click the “Try it yourself!” button below)
Add an id attribute to the paragraph tag. For example,
<p id="page-subtitle">Toggle to the CSS tab and make a new rule
#page-subtitle
{
}
Change the subtitle color by adding
color: yellow;inside the curly bracesChange the font by adding
font-family: 'Roboto Mono', monospace;inside the curly braces and adding@import url('https://fonts.googleapis.com/css?family=Roboto+Mono');at the top of the CSS tab

