Menu Screen
We’re almost done! To complete this game, we need to do two more things: add a UI and an Outline script to piece everything together. Let’s start with the UI.
Right click in the hierarchy window and, instead of selecting “Create Empty”, we want to create a canvas. Look for “UI” → “Canvas”. This is where all of our UI elements will be under.
Under “Canvas”, we want to create “UI” → “Image”. Rename “Image” to “Menu”. This will be our menu screen. In the Menu inspector, resize the width and height to 400 and 300 respectively. We then want to anchor the Menu screen to the middle. This way, even if the size of the window changes, the menu screen will stay in the middle. To do this, click on the squares in the top left corner under Rect Transform in the Menu inspector.
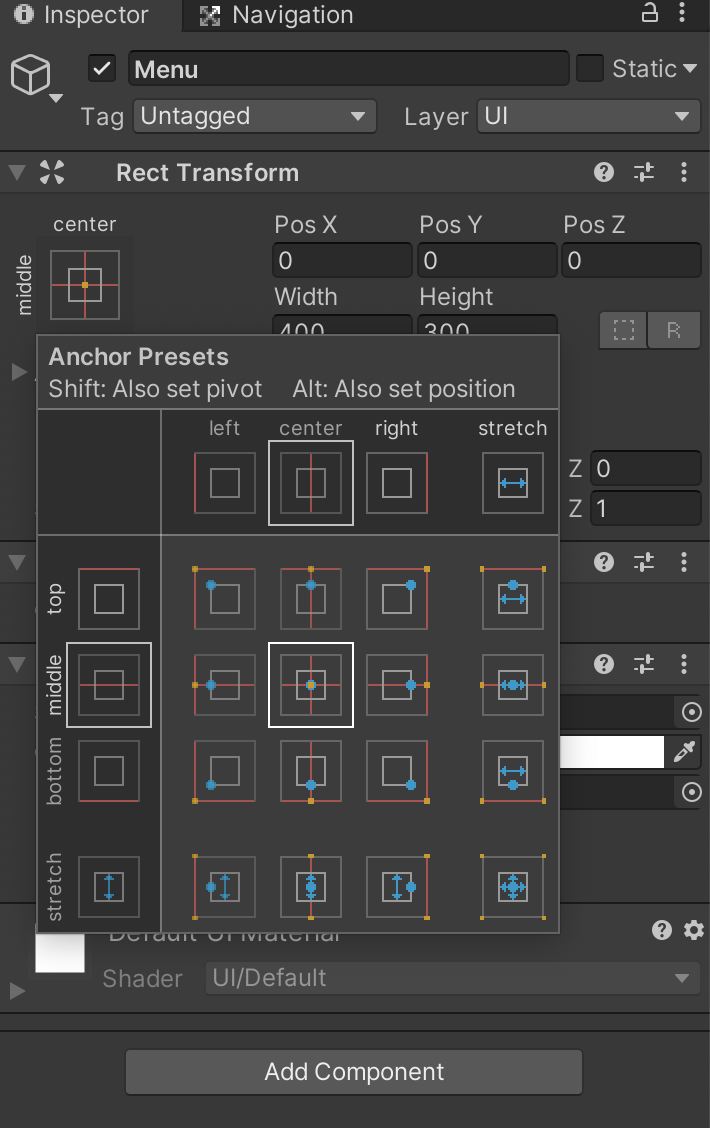
Hold both shift and alt (on Mac’s, hold option instead of alt) and select the middle/center in the Anchor presets. This will set the Menu’s pivot to 0 while setting the position to the middle/center.
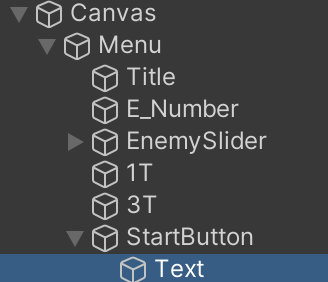
Now under Menu, create a “UI” → “Text” and rename it to “Title”. Change the text to whatever you would like to name your game under Text in the “Title” inspector! Let your creativity flow! We can also change the font size to whatever you like.
If the text disappears, use the rect tool to increase the size of the text box in the Scene window!
Change the anchor preset to the top/center. Tinker with the Pos Y input until you like the placement of your text!
Make another “UI” → “Text” under Menu in the hierarchy and rename that to “NumEnemyT”. Change the text to “# of Enemies” and change the font to a few sizes smaller than the Title. Make sure to set the anchor position to top/center as well and tinker with the Pos Y input!
Now, let’s create a way for the player to choose how many enemies they want! There are many ways to do this, but in this tutorial, we will be using a slider. To create a slider, right click under Menu and select “UI” → “Slider” and rename it to “EnemySlider”. Set the anchor position to the top/center as well and tinker with the Pos Y input so that it is right under the “# of Enemies” text. In the slider inspector under Slider, change the “Min Value” to “1” and “Max Value” to “3”. Also check the “Whole Number” box as we cannot have 1.5 enemies on the field!
Now that we have a slider, we need a visual key for the players to know how many enemies they can make! Make 2 more text boxes under Menu and name them “1T” and “3T” respectively. Change the “1T” text to “1” and set the anchor position to the middle/left. Tinker with the Pos X and Pos Y inputs under Rect Transform so that it lines up with the left side of the slider. Repeat the process with “3T” but change the text to “3”, anchor it to the middle/right, and line it up with the right side of the slider.
Now, let’s create a start button. Under Menu in the hierarchy window, create “UI” → “Button” and rename it to “StartButton”. Set the anchor position to the bottom/center and tinker with the Pos Y inputs to place it wherever you like! If we look in the hierarchy, there is an arrow attached to the StartButton. Click on it to reveal a Text object. Change the text for that Text object to “Start”.
We now have the menu screen all set up! Your menu screen should look a little something like this!

But wait! We’re not done yet! If we were to run the game and press the Start button, nothing happens! We want the menu screen to disappear. To do this, let’s make another script in our Scripts folder in the Projects window under Assets and name it “StartButton”. Open it up and copy and paste the code below!
using System.Collections;
using System.Collections.Generic;
using UnityEngine;

public class StartButton : MonoBehaviour
{

   public GameObject pop_up_box;


   public void popDown()
   {
       pop_up_box.SetActive(false);
   }

}
This code makes whatever GameObject that is assigned to pop_up_box disappear when the function popDown() is called. Save, then drag and drop this script from the Scripts folder into the StartButton inspector. Then drag the Menu from the hierarchy into the empty “Pop_up_box” under the “Start Button (Script)”.
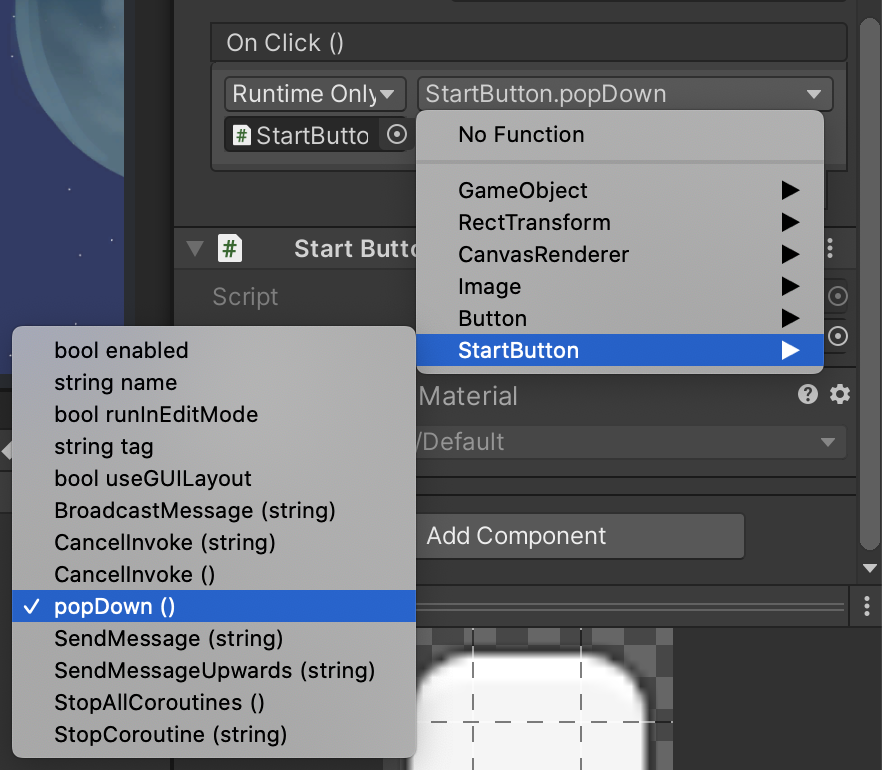
Finally, under “Button” in the StartButton inspector, click on the “+” sign in the “On Click()” box. Drag the “StartButton” from the hierarchy to the box that says “None (Object)”.
Then, pull down the “No Function” bar and hover over “StartButton”. Locate the popDown() function and select it.
Now, if we were to run the game and press the Start button, the menu screen disappears!