This is where we want you to pull up the Scoreboard and ADX viewer from earlier in separate windows to complete the remaining exercises. If you can’t or don’t want to use the Scoreboard, all questions for this section are listed below.
Remember any page with a video duplicates the lesson in both video and written form. You can follow one or the other depending on what type of learner you are.
KQL 101
[Be sure you use the SecurityLogs database for this exercise.]
Type the following query in the workspace to view the first rows in the Employees table. Press “run” or “shift + enter” to execute the query. All KQL code blocks for this workshop will be outlined in grey like the one below.
Employees
|   take 10
This query has a few parts. Let’s take a moment to break each of them down:


The take operator is a powerful tool you can use to explore rows in a table, and therefore better understand what kinds of data are stored there.
🎯Key Point – What to do when you don’t know what to do: Whenever you are faced with an unfamiliar database table, the first thing you should do is sample its rows using the take operator. That way, you know what fields are available for you to query and you can guess what type of information you might extract from the data source.
The Employees table contains information about all the employees in our organization. In this case, we can see that the organization is named “Envolve Labs” and the domain is “envolvelabs.com”.
You can easily write multiple queries in the same workspace tab. To do this, make sure to separate each query by an empty line. Notice below how we have separated the queries for the Employees, Email, and OutboundBrowsing tables by empty lines on lines 3 and 6.

When you have multiple queries, it’s important to tell ADX which query you want to run. To choose a query, just click on any line that is part of that query. Once you’ve selected a query, it will be highlighted in blue, as seen on lines 4 and 5 above.
Finding Out “How Many”: The ‘count’ Operator
We can use count to see how many rows are in a table. This tells us how much data is stored there.
Employees
|   count
Filtering Data With the ‘where’ Operator
So far, we’ve run queries that look at the entire contents of the table. Often in cybersecurity analysis, we only want to look at data that meets a set of conditions or criteria. To accomplish this, we apply filters to specific columns.
We can use the where operator in KQL to apply filters to a particular field. For example, we can find all the employees with the name “Linda” by filtering on the name column in the Employees table.
where statements are written using a particular structure. Use this helpful chart below to understand how to structure a where statement.

Employees
|   where name has "Linda"
The has operator is useful here because we’re looking for only a partial match. If we wanted to look for an employee with a specific first and last name (an exact match), we’d use the == operator:
Employees
|   where name == "Linda Holbert"
While performing their day-to-day tasks, Envolve Labs employees send and receive emails. A record of each of these emails is stored in the Email table.
🎯Key Point – User Privacy and Metadata: As you can imagine, some emails are highly sensitive. Instead of storing the entire contents of every email sent and received within the company in a database that can be easily accessed by security analysts, we only capture email metadata.
Email metadata includes information like: the time the email was sent, the sender, the recipient, the subject line, and any links the email may contain. Storing only email metadata, rather than entire contents, helps protect the privacy of our employees, while also ensuring that our security analysts can keep us safe. Sometimes even metadata can reveal sensitive information, so it’s important that you don’t talk about log data with other employees outside the SOC.
We can find information about the emails sent or received by a user by looking for their email address in the sender and recipient fields of the Email table. For example, we can use the following query to see all the emails sent by “Michael Montello”:
Email
|   where sender == "michael_montello@envolvelabs.com"
Easy as 1, 2, 3… Compound Queries and the distinct Operator
We can use the distinct operator to find unique values in a particular column. We can use the following query to determine how many of the organization’s users sent emails.

This is our first time using a multi-line query with multiple operators, so let’s break it down:
In line 2, we take the Email table and filter the data down to find only those rows with “envolvelabs” in the sender column.
In line 3, we add another pipe character ( | ) and use the distinct operator to find all the unique senders. Here, we aren’t finding the unique senders for all of the email senders, but only the unique senders that are left after we apply the filter looking for rows with “envolvelabs” in the sender column.
Finally, in line 4, we add another pipe character ( | ) and then use the count operator to count the results of lines 1-3 of the query.
Tracking Down a Click: OutboundBrowsing Data
When employees at Envolve Labs browse to a website from within the corporate network, that browsing activity is logged. This is stored in the OutboundBrowsing table, which contains records of the websites browsed by each user in the company. Whenever someone visits a website, a record of it stored in the table. However, the user’s name is not stored in the table, only their IP address is recorded. There is a 1:1 relationship between users and their assigned IP addresses, so we can reference the Employees table to figure out who browsed a particular website.
If we want to figure out what websites Annie Jackson visited, we can find her IP address from the Employees table.
Employees
|   where name == "Annie Jackson"
The query above tells us her IP address is “192.168.3.168”. We can take her IP address and look in the OutboundBrowsing table to determine what websites she visited.
OutboundBrowsing
| where src_ip == "192.168.3.168"
What’s in a Name? All about Passive DNS Data
Although domain names like “google.com” are easy for humans to remember, computers don’t know how to handle them. So, they convert them to machine readable IP addresses. Just like your home address tells your friends how to find your house or apartment, an IP address tells your computer where to find a page or service hosted on the internet.
🎯Key Point – Practice Good OPSEC: If we want to find out which IP address a particular domain resolves to, we could just browse to it. But, if the domain is a malicious one, you could download malicious files to your corporate analysis system or tip off the attackers that you know about their infrastructure. As cybersecurity analysts, we must follow procedures and safeguards that protect our ability to track threats. These practices are generally called operational security, or OPSEC.
To eliminate the need to actively resolve (that is- directly browse to or interact with a domain to find it’s related IP address) every domain we’re interested in, we can rely on passive DNS data. Passive DNS data allows us to safely explore domain-to-IP relationships, so we can answer questions like:
- Which IP address does this domain resolve to?
- Which domains are hosted on this IP address?
- How many other IPs have this domain resolved to?
These domain-to-IP relationships are stored in our PassiveDns table.
Question 7. 🤔 How many domains in the PassiveDns records contain the word “vaccine”? (hint: use the contains operator instead of has. If you get stuck, do a take 10 on the table to see what fields are available.)
Question 8. 🤔 What IPs did the domain “biotechenvolv.science” resolve to?
🤯Let statements – making your life a bit easier:
Sometimes we need to use the output of one query as the input for a second query. The first way we can do this is by manually typing the results into next query.
- For example, what if we want to look at all the web browsing activity from employees named “Linda”?
- First, you would need to go into the Employees table and find the IP addresses used by these employees.

Then, you could manually copy and paste these IPs into a query against the OutboundBrowsing table. Note that we can use the in operator to choose all rows that have a value matching any value from a list of possible values. In other words, the == (comparison) operator looks for an exact match, while the in operator checks for any values from the list.

Although this is a valid way to get the information you need, it may not be as elegant (or timely) if you had 100 or even 1000 employees named “Linda.”
We can accomplish this in a more elegant way by using a let statement , which allows us to assign a name to an expression or a function. We can use a let statement here to save and give a name to the results of the first query so that the values can be re-used later. That means we don’t have to manually type or copy and paste the results repeatedly.

On the left of the let statement is the variable name (“linda_ips” in this case). The variable name can be whatever we want, but it is helpful to make it something meaningful that can help us remember what values it is storing.
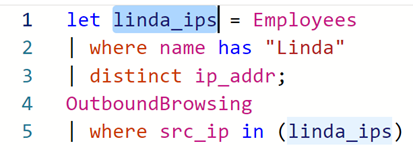
On the right side of the let statement in the expression you are storing. In this case, we use the distinct operator to select values from only one column – so they are stored in an array – or list of values.
The let statement is concluded by a semi-colon.
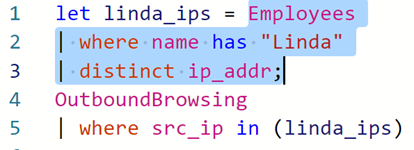
After we store the value of a query into a variable using the let statement, we can refer to it as many times as we like in the rest of the query. The stored query does not show any output. Remember, however, that your KQL query must have a tabular statement – which means that you must have another query following your let statement.
🎯Key Point – Pivoting: Part of being a great cyber analyst is learning how to use multiple data sources to tell a more complete story of what an attacker has done. We call this “pivoting.” We pivot by taking one known piece of data in one dataset and looking in a different dataset to learn something we didn’t already know. You practiced this here when we started in one dataset – the Employees table – and used knowledge from there to find related data in another source – OutboundBrowsing.